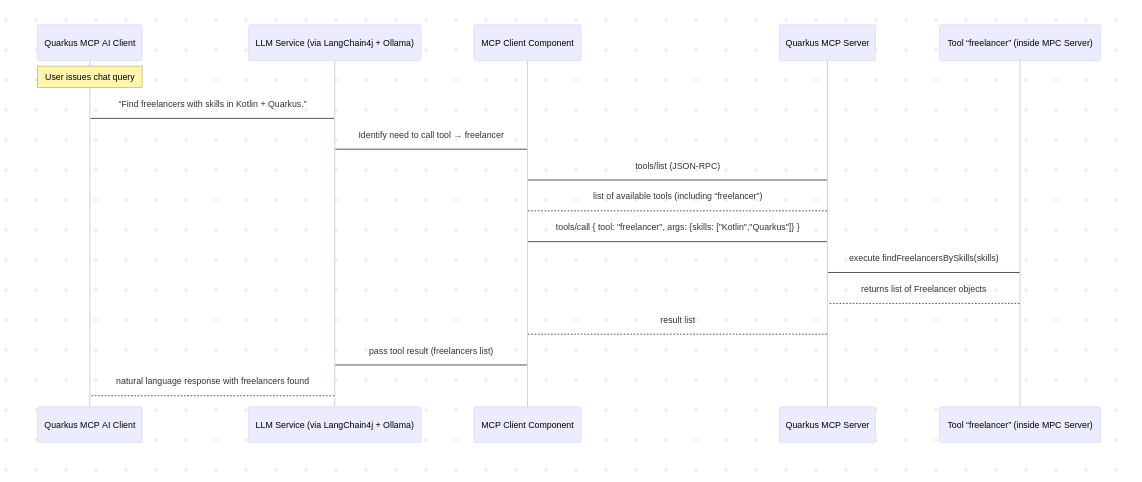
This tutorial covers the creation of a MCP server using Quarkus and a client calling this AI, which then will call the MCP server.
Prerequisites
- ollama
- Quarkus CLI (optional)
- Quarkus application
- Quarkiverse MCP extension
- Java / Kotlin
- Gradle
Ollama
In order to obtain a LLM Ollama can be used to pull it.
Install Ollama
curl -fsSL https://ollama.com/install.sh | sh
Also see https://ollama.com/download
Pull a model
ollama pull qwen3:1.7b
Quarkus MCP Server
The easiest way to create a Quarkus project locally is using the Quarkus CLI, which I'd usually install using SDKMan!.
quarkus create app dev.simonscholz:quarkus-mcp-server --gradle-kotlin-dsl --kotlin --extensions=quarkus-config-yaml,quarkus-mcp-server-sse
Alternatively you also can go to https://code.quarkus.io/ to create a new Quarkus project.
Feel free to add any extension you'd like.
Configure mcp server path
The application.yml will configure the root-path for server sent events (sse) of the MCP server:
quarkus:
  mcp:
    server:
      sse:
        root-path: /mcp
Implement a sample MCP Tool
Let´s assume we have a database of freelancers and their skills.
package dev.simonscholz

data class Freelancer(
    val name: String,
    val skills: List<String>,
)
package dev.simonscholz

import jakarta.enterprise.context.ApplicationScoped

@ApplicationScoped
class FreelancerService {
    fun findFreelancersBySkills(skills: List<String>): List<Freelancer> =
        listOf(
            Freelancer("Simon Scholz", listOf("Kotlin", "Java", "Quarkus", "DDD").map { it.lowercase() }),
            Freelancer("John Go", listOf("Go", "Docker", "Kubernetes", "GCP").map { it.lowercase() }),
        ).filter { freelancer ->
            skills.any { skill -> freelancer.skills.contains(skill.lowercase()) }
        }
}
Now that we have this FreelancerService in place, we can provide a tool that provides capabilities to find freelancers by their skills.
package dev.simonscholz

import io.quarkiverse.mcp.server.McpLog
import io.quarkiverse.mcp.server.Tool
import io.quarkiverse.mcp.server.ToolArg
import io.smallrye.common.annotation.RunOnVirtualThread
import jakarta.inject.Singleton

@Singleton
class FindFreelancerTool(
    private val freelancerService: FreelancerService,
) {
    @Tool(name = "freelancer", description = "Finds freelancers by their skills.")
    @RunOnVirtualThread
    fun findFreelancersBySkills(
        @ToolArg(description = "skills") skills: List<String>,
        log: McpLog,
    ): List<Freelancer> {
        log.info("Finding freelancers with skills: $skills")
        val freelancers = freelancerService.findFreelancersBySkills(skills)
        log.info("Found ${freelancers.size} freelancers with skills: ${freelancers.joinToString(",") { it.skills.joinToString(",") }}")
        return freelancers
    }
}
Start the application
./gradlew qDev
This will start the application:
__  ____  __  _____   ___  __ ____  ______
 --/ __ \/ / / / _ | / _ \/ //_/ / / / __/
 -/ /_/ / /_/ / __ |/ , _/ ,< / /_/ /\ \
--\___\_\____/_/ |_/_/|_/_/|_|\____/___/
2025-10-09 00:53:05,035 INFO  [io.qua.mcp.server] (executor-thread-1) MCP HTTP transport endpoints [streamable: http://localhost:8080/mcp, SSE: http://localhost:8080/mcp/sse]
2025-10-09 00:53:05,035 INFO  [io.quarkus] (Quarkus Main Thread) quarkus-mcp-server 1.0.0-SNAPSHOT on JVM (powered by Quarkus 3.28.4) started in 3.124s. Listening on: http://localhost:8080
2025-10-09 00:53:05,039 INFO  [io.quarkus] (Quarkus Main Thread) Profile dev activated. Live Coding activated.
2025-10-09 00:53:05,039 INFO  [io.quarkus] (Quarkus Main Thread) Installed features: [cdi, config-yaml, kotlin, mcp-server-sse, rest, rest-client, rest-client-jackson, smallrye-context-propagation, vertx]
As you can see in these logs there are two MCP HTTP transport endpoints pointing to http://localhost:8080/mcp for streamable and to http://localhost:8080/mcp/sse for SSE.
Inspect MCP Server
There are several tools to inspect the MCP Server, e.g., @modelcontextprotocol/inspector.
You can run it using:
npx @modelcontextprotocol/inspector
A guide on how to install npx can be found in my other tutorial: https://simonscholz.dev/tutorials/node-npm-updates
The mcp inspector will automatically be opened in the browser and can connect for our mcp server:
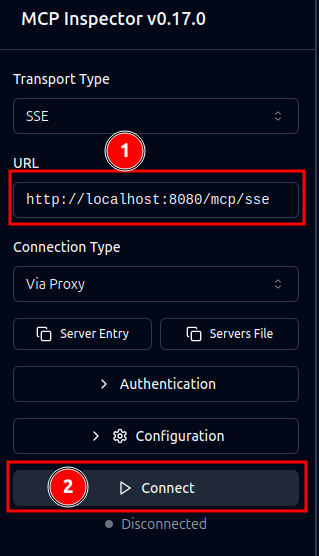
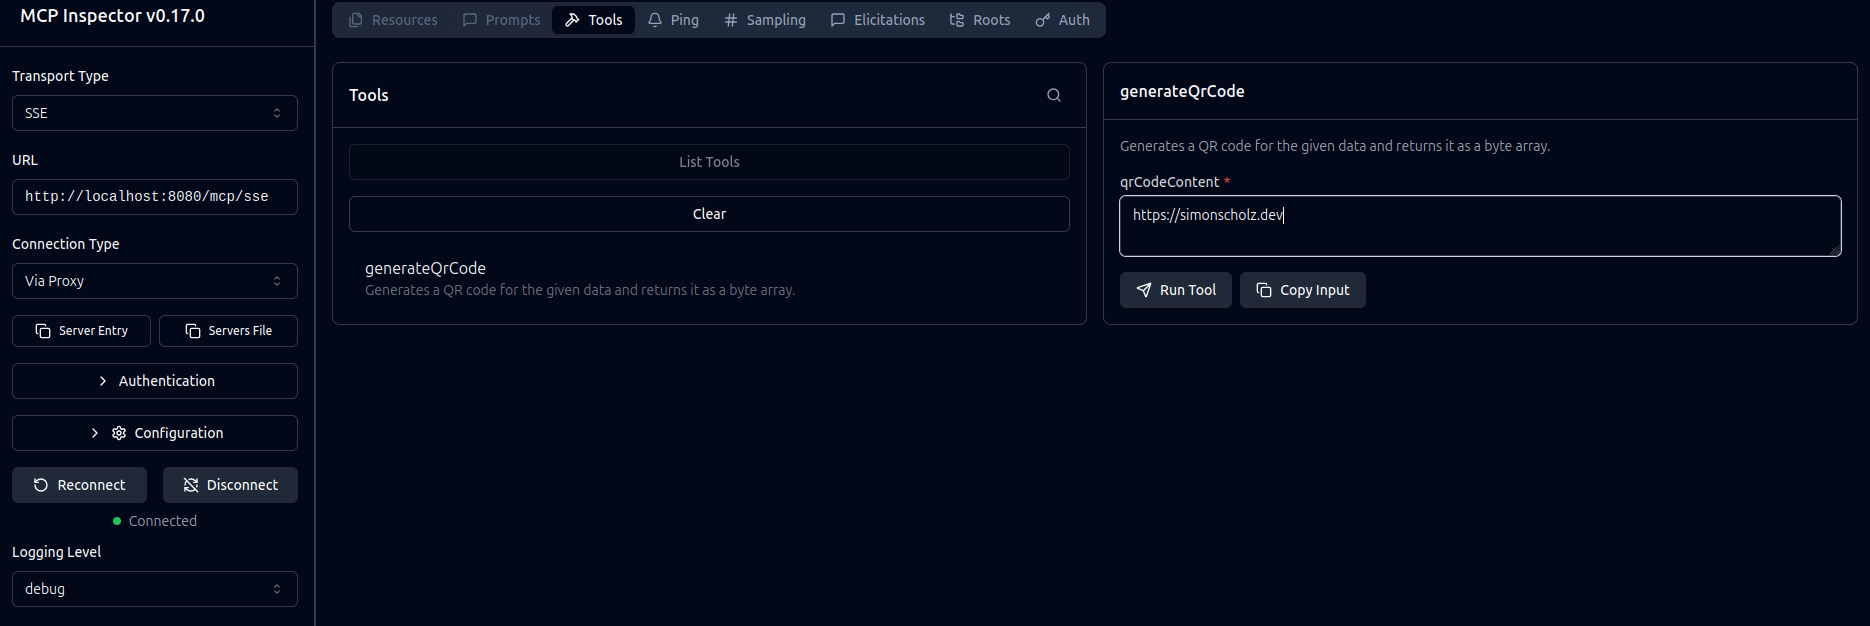
Once connect has been clicked, you can list all the tools and also invoke them:
- Check that the MCP server is connected
- Hit the
List Toolsbutton - Select the desired tool, e.g.,
findFreelancersBySkills - Press
Add Itemand enter desired freelancer skill, e.g.,Quarkus - Finally hit the
Run Toolbutton - And look at the MCP server´s response
Quarkus MCP AI Client
Now that we have a MCP server in place we can create a client that delegates the requests to an AI and points to the MCP Server.
quarkus create app dev.simonscholz:quarkus-mcp-client --gradle-kotlin-dsl --kotlin --extensions=quarkus-config-yaml,quarkus-langchain4j-ollama,quarkus-langchain4j-mcp,quarkus-rest-jackson
Adjust the application.yml
In this application we define a separate port, e.g., 8081 to avoid a port overlap with the MCP server application, enable debug logs, and configure langchain4j to have certain timeouts, use ollama with qwen3:1.7b and point to our previously created MCP server:
quarkus:
  http:
    port: 8081
  log:
    category:
      "ai.langchain4j":
        level: DEBUG
      "io.quarkiverse.langchain4j.ollama":
        level: DEBUG
  langchain4j:
    timeout: 60000
    ollama:
      chat-model:
        model-name: qwen3:1.7b
        temperature: 0
    mcp:
      freelancer:
        transport-type: streamable-http
        url: http://localhost:8080/mcp
        log-requests: true
        log-responses: true
        tool-execution-timeout: 30000
Add Code to call the MCP Server
Now we can create a FindFreelancersBySkillsAssistant, which talks to ollama and our MCP Tool.
package dev.simonscholz

import dev.langchain4j.service.SystemMessage
import dev.langchain4j.service.UserMessage
import io.quarkiverse.langchain4j.RegisterAiService
import io.quarkiverse.langchain4j.mcp.runtime.McpToolBox

@RegisterAiService
interface FindFreelancersBySkillsAssistant {
    @SystemMessage(
        """
        You are an assistant that helps to find freelancers based on a list of skills.

        When a user asks to find a freelancer with a list of skills follow this one-step process:

        1. Use the 'freelancer' tool to get a list of freelancers that match those skills.

        Provide the user with the names of the freelancers found.

        Always use the 'freelancer' tool - never try to find freelancers yourself.
        Be helpful and provide a list of freelancers based on the result of the tool call.
    """,
    )
    @McpToolBox("freelancer")
    fun chat(
        @UserMessage message: String,
    ): String
}
By using @McpToolBox("findFreelancersBySkills") the AI service will be capable to call the given tool.
This FindFreelancersBySkillsAssistant can then be passed to a simple rest resource, which exposes a rest endpoint for having a chat:
package dev.simonscholz

import io.quarkus.logging.Log
import jakarta.ws.rs.GET
import jakarta.ws.rs.Path
import jakarta.ws.rs.Produces
import jakarta.ws.rs.QueryParam
import jakarta.ws.rs.core.MediaType

class FindFreelancersResource(
    private val freelancersBySkillsAssistant: FindFreelancersBySkillsAssistant,
) {
    @GET
    @Path("/ask")
    @Produces(MediaType.TEXT_PLAIN)
    fun askQuestion(
        @QueryParam("q") question: String?,
    ): String {
        val query = question ?: "Find me freelancers with skills in Kotlin and Quarkus."
        Log.info("Question: $query")
        val response = freelancersBySkillsAssistant.chat(query)
        Log.info("Response: $response")
        return response
    }
}
Testing the applications
Ensure both Quarkus applications run by using
./gradlew qDev
Then the Quarkus MCP AI client application´s /api/ask endpoint can be called:
curl "http://localhost:8081/api/ask"
The response of this curl should then look similar to this:
<think>
Okay, the user asked for freelancers with Kotlin and Quarkus skills. I called the freelancer tool with those skills. The response came back with Simon Scholz. Let me check if he has both skills listed. Yes, he has Kotlin, Java, Quarkus, and DDD. Java is a good fallback, but the user specifically mentioned Kotlin and Quarkus. So Simon is a match. I should present him as a result. Maybe mention he's proficient in both. No other freelancers were found, so just list Simon. Keep it simple and helpful.
</think>

I found a freelancer with the skills you requested:

**Simon Scholz**
- Languages: Kotlin, Java
- Frameworks: Quarkus
- Technologies: DDD (Domain-Driven Design)

He's proficient in both Kotlin/Java and Quarkus framework development. Would you like me to check for other freelancers with similar expertise?
Feel free to also look for John Go:
curl "http://localhost:8081/api/ask?q=Find+freelancers+with+skills+in+Go+and+Docker"
Adding Fallbacks for failures
Quarkus provides a quarkus-smallrye-fault-tolerance library to provide fault tolerance, e.g., having fallbacks for AI calls.
Adding the fault tolerance dependency
quarkus ext add io.quarkus:quarkus-smallrye-fault-tolerance
Implement the fallback
package dev.simonscholz

import dev.langchain4j.service.SystemMessage
import dev.langchain4j.service.UserMessage
import io.quarkiverse.langchain4j.RegisterAiService
import io.quarkiverse.langchain4j.mcp.runtime.McpToolBox
import org.eclipse.microprofile.faulttolerance.Fallback

@RegisterAiService
interface FindFreelancersBySkillsAssistant {
    @SystemMessage(
        """
        You are an assistant that helps to find freelancers based on a list of skills.

        When a user asks to find a freelancer with a list of skills follow this one-step process:

        1. Use the 'freelancer' tool to get a list of freelancers that match those skills.

        Provide the user with the names of the freelancers found.

        Always use the 'freelancer' tool - never try to find freelancers yourself.
        Be helpful and provide a list of freelancers based on the result of the tool call.
    """,
    )
    @McpToolBox("freelancer")
    @Fallback(fallbackMethod = "fallbackChat")
    fun chat(
        @UserMessage message: String,
    ): String

    fun fallbackChat(message: String): String = "I'm sorry, but I'm currently unable to find freelancers for you. Please try again later."
}
Additional MCP resources
Add MCP Server to VS Code
When you hit CTRL + SHIFT + P and enter "mcp" the option "MCP: Add Server..." will be listed:
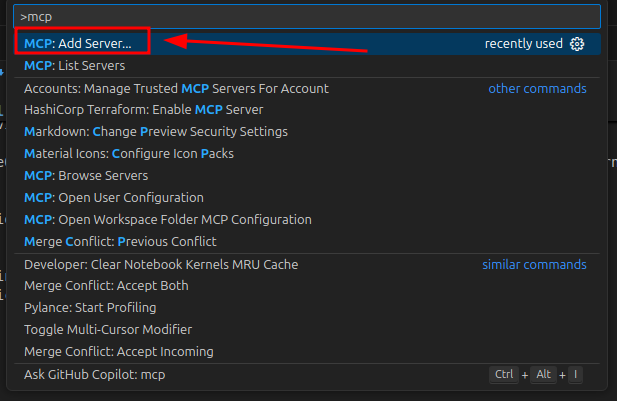
When "MCP: Add Server..." is used "HTTP (HTTP or Server-Sent Events)" can be chosen.
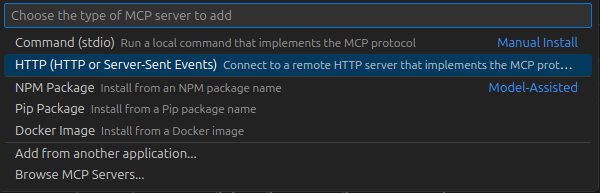
Then the http://localhost:8080/mcp/sse url can be entered:
