Sometimes you want to test a Gradle plugin locally before publishing it to a remote repository or the Gradle plugin portal. This tutorial shows you how to do that.
And besides local testing I recently created a Pull Request for a Gradle plugin and wanted to make use of it before it was merged and published to the Gradle plugin portal.
Prerequisites
- Gradle
- Java and/or Kotlin
Create a Gradle plugin
First, we need a Gradle plugin to test. We can create one with the Gradle plugin development plugin. Create a new directory and run the following command in it:
mkdir local-gradle-plugin
cd local-gradle-plugin

gradle init \
    --use-defaults \
    --type kotlin-gradle-plugin \
    --dsl kotlin \
    --test-framework junit-jupiter \
    --project-name local-gradle-plugin \
    --package com.example \
    --no-split-project \
    --no-incubating \
    --java-version 21
With this you can start developing your Gradle plugin. Feel free to choose Java as language or other options if you prefer.
For this tutorial we will use the following code:
The generated project contains will already contain a kind of "Hello World" plugin, which we can use for this tutorial.
/*
 * This Kotlin source file was generated by the Gradle 'init' task.
 */
package com.example

import org.gradle.api.Project
import org.gradle.api.Plugin

/**
 * A simple 'hello world' plugin.
 */
class LocalPluginDependenciesPlugin: Plugin<Project> {
    override fun apply(project: Project) {
        // Register a task
        project.tasks.register("greeting") { task ->
            task.doLast {
                println("Hello from plugin 'com.example.greeting'")
            }
        }
    }
}
Add a group and a version to the plugin
To use the plugin in another project we need to add a version to the plugin. We can do that by adding a version property to the gradlePlugin block in the build.gradle.kts file of the plugin folder:
version = "0.1.0"
group = "com.example.greeting"
Deploy the plugin to the local Maven repository
To test the plugin locally we need to deploy it to the local Maven repository. We can do that with the Maven Publish plugin.
Add maven-publish to the plugins block in the build.gradle.kts file of the plugin folder:
plugins {
    // Apply the Java Gradle plugin development plugin to add support for developing Gradle plugins
    `java-gradle-plugin`
    `maven-publish`

    // Apply the Kotlin JVM plugin to add support for Kotlin.
    alias(libs.plugins.jvm)
}
With the maven-publish plugin in place we can now deploy the plugin to the local Maven repository with the following command:
./gradlew publishToMavenLocal
Use the plugin in another project
Create a new project
Let's use the init task again to create an application, which uses the plugin we just created.
cd .. # go back to the parent directory, where we created the plugin
mkdir local-plugin-dependency
cd local-plugin-dependency

gradle init \
    --type kotlin-application \
    --dsl kotlin \
    --test-framework junit-jupiter \
    --project-name local-plugin-dependency \
    --package com.example \
    --no-split-project \
    --no-incubating \
    --java-version 21
Apply the plugin
Add the following to the settings.gradle.kts file:
pluginManagement {
    repositories {
        mavenLocal()
        mavenCentral()
        gradlePluginPortal()
    }
}

// ... other generated code
Now that mavenLocal is part to the repositories block, we can apply the plugin to the project:
plugins {
    // ... other plugins

    id("com.example.greeting") version("0.1.0")
}
Run the plugin task
Now we can run the plugin task with the following command:
./gradlew greeting
Using the local plugin in CI/CD pipeline
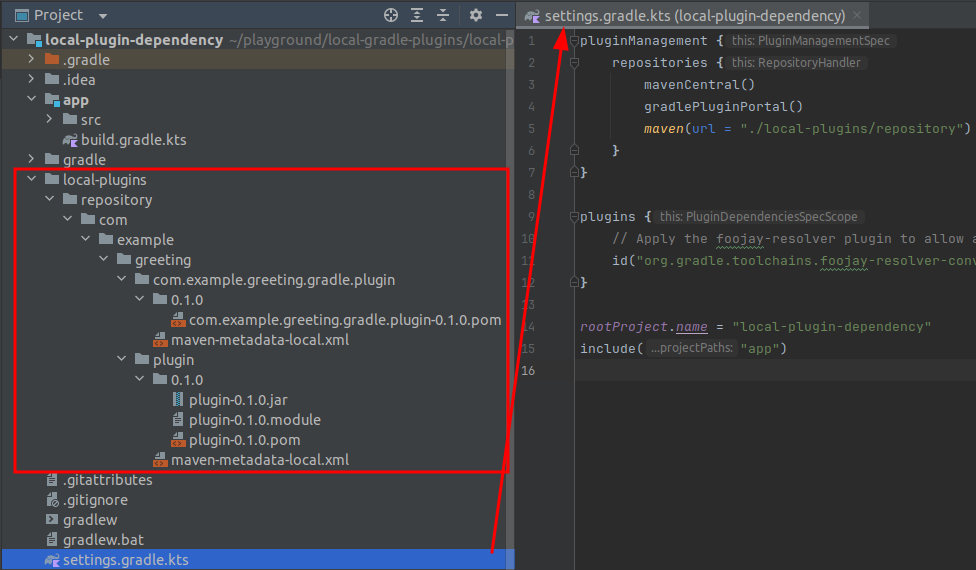
The easiest way to use the local plugin in a CI/CD pipeline without publishing it to a remote repository is to reference it in the settings.gradle.kts file of the project, which uses the plugin.
pluginManagement {
    repositories {
        mavenCentral()
        gradlePluginPortal()
        maven(url = "./local-plugins/repository")
    }
}
The contents of the local-plugins/repository then need to be copied from the local Maven repository.
For our example it would be ~/.m2/repository/com/example/greeting/.

When the plugin you want to use is part of the source code repository a CI/CD pipeline can pick up the local plugin and use it in the pipeline.
Now you can run ./gradlew greeting again and this time it will use the local plugin.
