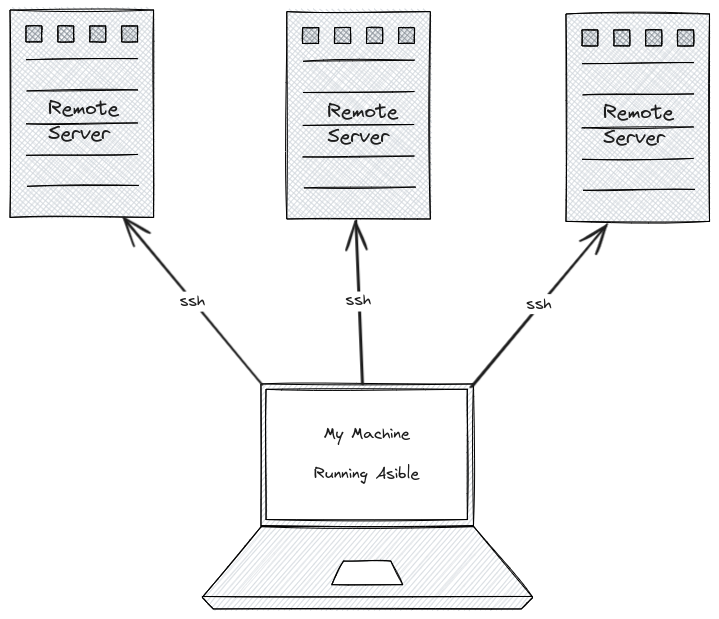
Ansible is a IaC (infrastructure as code) tool, which can automate a lot of tasks and makes setups reproducible. Ansible has a concept of playbooks to be run to apply certain workflows, e.g., setting up a server using a VPS provider. It is good practice to use a distributed version control system, e.g., GIT, to store all ansible files.
Install
There are several ways to install ansible, which can be found here: https://docs.ansible.com/ansible/latest/installation_guide/intro_installation.html
For Ubuntu it can be done like this:
# Install pipx (if not already installed)
sudo apt install pipx

# Install Ansible
pipx install --include-deps ansible
To validate if Ansible is installed properly on your machine just run ansible ---version
Install Ansible Lint (optional)
It is helpful to check for having proper yml files in your Ansible setup.
pipx install ansible-dev-tools && pipx install ansible-lint
With the dev tools in place ansible-lint can be run from the command line
or will be used by the Ansible VS Code extension, which we'll discuss later on.
Install Virtualbox (optional)
In case you already have a server, which you intend to use you can skip this step.
In order to test ansible you can run an Ubuntu server in Virtualbox on your local machine.
sudo apt install virtualbox virtualbox-qt virtualbox-dkms
Now you can download the latest ubuntu server version here: https://ubuntu.com/download/server
Once the Ubuntu iso file is downloaded you can start Virtualbox and hit the New button.
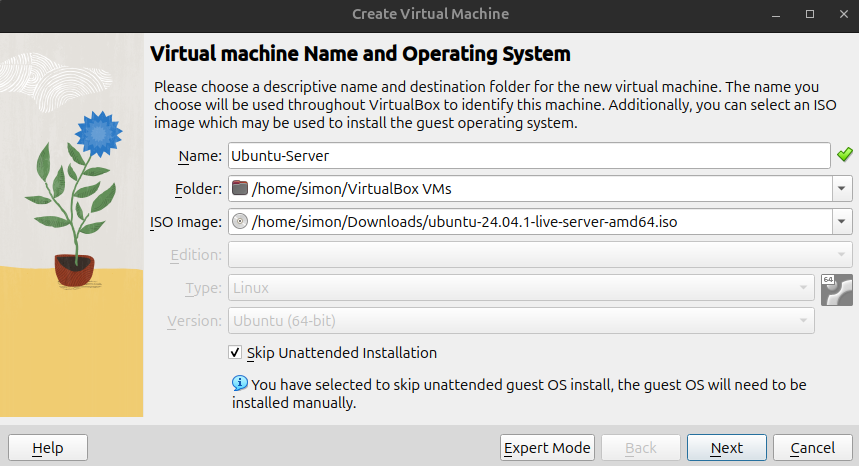
Then just follow the steps and finally run the Ubuntu server in Virtualbox.
When installing Ubuntu server please make sure to select and install OpenSSH server by checking the box "Install OpenSSH server".
There are plenty of tutorials out there in case you face issues. I myself found this Video really helpful: How to Run an Ubuntu Server VM with VirtualBox (and login via SSH)
Virtualbox network issues
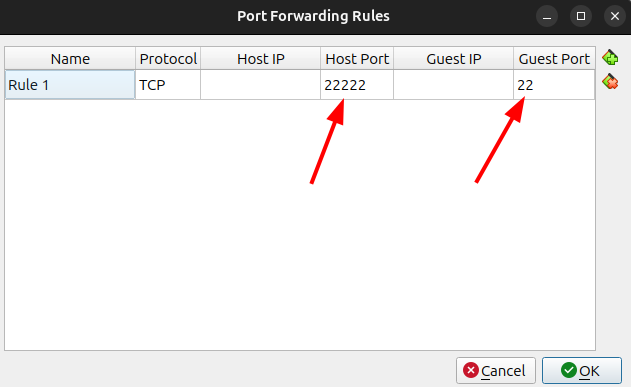
In case port 22 is already occupied or you face other network issues you can configure the network of your VM.
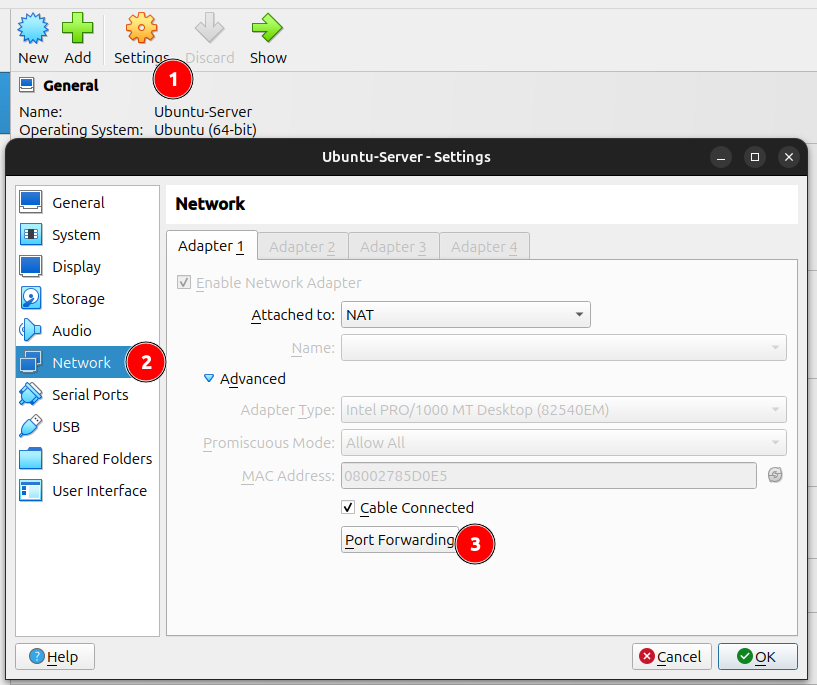
And then you can change the port to talk to by using port forwarding:
Setup ssh key
For better security and convenience it is highly recommended to use ssh keys to connect to a machine via ssh.
ssh-keygen -t ed25519 -C "ansible"
Now you'll be prompted to enter the file path.
Since there usually already is a default file you might want to choose a different file name, e.g., /home/your-username/.ssh/ansible.
In order to let ansible do it's job later on we won't add a passphrase for this ssh key.
⚠️ Please keep this ssh secret, since this will be the credential/password to your server.
Copy ssh key to the server
Now the generated ssh key has to be propagated to the server.
ssh-copy-id -i ~/.ssh/ansible.pub -p 22222 localhost

# if username on server is different
ssh-copy-id -i ~/.ssh/ansible.pub -p 22222 {username-on-server}@localhost
The first time you'd connect to the server you're asked the following
Are you sure you want to continue connecting (yes/no/[fingerprint])? yes
Please be sure to answer this with yes.
In case that did not work you can also ssh into your server using the password and then copy the contents of your ~/.ssh/ansible.pub file and write it to ~/.ssh/authorized_keys:
echo "ssh-ed25519 AAAAC3NzaC1lZDI1NTE5AAAAIM0IWm4fVLFOYFydagOnkqaEvu9jnTUARRUYfQ0XnxFR ansible" >> authorized_keys
Now you can ssh into your server using your ssh key:
ssh -i ~/.ssh/ansible -p 22222 localhost
-p 22222 is used to set 22222 as port, because otherwise the default ssh port 22 is used.
Git Repository
As mentioned earlier it makes sense to use version control to store the ansible config and playbooks.
mkdir ansible
cd ansible
git init
To let Ansible know, which servers it should ssh into an inventory file can be created:
localhost

{other-ip-addresses-or-domains}
To let Ansible implicitly pickup the inventory file an ansible.cfg config file can be created:
[defaults]
inventory = inventory
private_key_file = ~/.ssh/ansible
# optional if not using default 22 port
remote_port = 22222
Ansible Lint GitHub Action
Ansible lint also provides a GitHub Action to check your Ansible files hosted on GitHub.
Please see Installing Ansible Lint as a GitHub Action for detailed information.
First Ansible commands
Within the git repository ansible folder the following commands can be run:
# Simply ping all servers
ansible all -m ping

# Gather meta data from all servers
ansible all -m gather_facts
The ping command will result in the following:

In case you do not have the ansible.cfg in place you can reference the key file and inventory.
# Simply ping all servers
ansible all --key-file ~/.ssh/ansible -i inventory -m ping

# Gather meta data from all servers
ansible all --key-file ~/.ssh/ansible -i inventory -m gather_facts
Grep dedicated facts
When running gather_facts the list is quite long
and using grep can help to target certain meta data.
ansible all -m gather_facts | grep ansible_distribution

In case you're having multiple servers in your inventory
and want to target a certain server the --limit flag can be used:
ansible all -m gather_facts --limit localhost | grep ansible_distribution
Using VS Code (optional)
Red Hat provides a helpful Ansible extension for VS Code in the Extension marketplace.
This extension comes with reasonable syntax highlighting and code completion for Ansible files.
The following rules apply to make the Ansible extension work out of the box.
- yaml files under /playbooks dir.
- files with the following double extension: .ansible.yml or .ansible.yaml.
- notable yaml names recognized by ansible like site.yml or site.yaml
- yaml files having playbook in their filename: playbook.yml or playbook.yaml
That's the reason why I add playbook to the file name of a playbook in the next chapter.
In case you've installed the Ansible Lint, which I recommend, the Ansible VS Code extension run ansible-lint automatically and shows lint issues right away in the editor.
First Ansible playbook
Let's create our first Ansible playbook called first_playbook.yml inside the git repository.
---

- name: My first playbook
  hosts: all
  become: true
  tasks:
    - name: Update repository index
      ansible.builtin.apt:
        update_cache: true
      when: ansible_distribution == "Ubuntu"
become: trueis used since we needsudofor theaptcommands.- Then we simply give the one task a
name. - Using the
aptinstruction. See ansible apt module. - The
whenexpression can be used to specify for which kind of server this task applies.
The first_playbook.yml playbook can be run like this:
ansible-playbook --ask-become-pass first_playbook.yml
Running this should lead to a similar result:

Any time a playbook is run the gather_facts task will be run implicitly to make use of the facts within the playbooks,
e.g., in the when expression.
We can also see here that the apt cache is updated, so we successfully ran our first playbook. 🙌
In case you do not want to consider apt update as a change, since it is normal that this changes, changed_when: false can be used:
---
- name: My first playbook
  hosts: all
  become: true
  tasks:
    - name: Update repository index
      ansible.builtin.apt:
        update_cache: true
      changed_when: false
changed_when: falsemeans that this task won't be considered as change, since apt update usually changes a lot
Adding files to the system
In order to work with files a files directory needs to be added.
So let's create a files directory and create a README.md file in it.
mkdir files
echo "## My Ansible Setup" >> files/README.md
Now that the README.md is in place another Add README.md task can be added to our playbook.
---
- name: My first playbook
  hosts: all
  become: true
  tasks:
    - name: Update repository index
      ansible.builtin.apt:
        update_cache: true
      changed_when: false
      when: ansible_distribution == "Ubuntu"

    - name: Add README.md
      ansible.builtin.copy:
        src: README.md
        dest: /home/simon
        owner: root
        group: root
        mode: "0644"
Please note that src: assumes that the files are located in the files directory.
ansible-playbook --ask-become-pass first_playbook.yml
After running the playbook the README.md file can be found in /home/simon/ on the server.
Dedicated ansible user
It is considered good practice to have a dedicated user to run the ansible playbooks.
Since that new user should also be a sudoer (allowed to run sudo commands),
we'll add a sudoer_simon_ansible file to the files directory.
echo "simon-ansible ALL=(ALL) NOPASSWD: ALL" >> files/sudoer_simon_ansible
This sudoer_simon_ansible will now also be used in the playbook:
---
- name: My first playbook
  hosts: all
  become: true
  tasks:
    - name: Update repository index
      ansible.builtin.apt:
        update_cache: true
      changed_when: false
      when: ansible_distribution == "Ubuntu"

    - name: Add README.md
      ansible.builtin.copy:
        src: README.md
        dest: /home/simon
        owner: root
        group: root
        mode: "0644"

    - name: Add simon-ansible user
      ansible.builtin.user:
        name: simon-ansible
        groups:
          - root

    - name: Add ssh key (user simon-ansible)
      authorized_key:
        user: simon-ansible
        key: "ssh-ed25519 AAAAC3NzaC1lZDI1NTE5AAAAIM0IWm4fVLFOYFydagOnkqaEvu9jnTUARRUYfQ0XnxFR ansible"

    - name: Add sudoers file (user simon-ansible)
      ansible.builtin.copy:
        src: sudoer_simon_ansible
        dest: /etc/sudoers.d/simon-ansible
        owner: root
        group: root
        mode: "0644"
- The
Add simon-ansible usertask just creates a user calledsimon-ansibleand adds it to the root group. Add ssh key (user simon-ansible)adds our public key~/.ssh/ansible.pubfor the usersimon-ansibleas authorized_keyAdd sudoers file (user simon-ansible)will copy the contents ofsudoer_simon_ansibleinto/etc/sudoers.d/simon-ansible.
⚠️ Please be cautious adding a user to the root group, but we'll elaborate on security later on.
Now we can run the playbook once again to create the simon-ansible user.
ansible-playbook --ask-become-pass first_playbook.yml
Once the user is in place we can tell ansible to use this user using the remote_user property.
remote_user: can either be added to any task, but I prefer to simply add it to the ansible.cfg file:
[defaults]
inventory = inventory
private_key_file = ~/.ssh/ansible
remote_user=simon-ansible
# optional if not using default 22 port
remote_port = 22222
Once this is done --ask-become-pass can be omitted, since the simon-ansible is authorized by the ssh key:
ansible-playbook first_playbook.yml
Working with variables
Variables can be used in Ansible files using {{your_variable}}
and there are several ways to inject variables into a playbook run.
You can pass them via command line, e.g., using -e "user=simon,
where variables have highest precedence.
Also see Understanding variable precedence
Since I myself prefer to not have a too complex cli command to be run, I'd rather put my variable in a dedicated file.
mkdir vars && echo "user: simon-ansible" >> vars/variables.yml
Now that we have the user variable in place, let's reference it in the playbook:
---
- name: My first playbook
  hosts: all
  become: true
  vars_files:
    - ./vars/variables.yml
  tasks:
    - name: Add simon-ansible user
      ansible.builtin.user:
        name: "{{ user }}"
        groups:
          - root
vars_filesis a list of files, which can include variables.- The
{{ user }}variable is referenced from./vars/variables.yml
When you now run the playbook the user will be taken from the ./vars/variables.yml file.
ansible-playbook first_playbook.yml
For more information also see Ansible Docs: Using Variables
Encrypt secrets (Ansible Vault)
Since Ansible are usually shared in a git repo, you should encrypt your secret data, even though the git repo might be private.
Encrypt
In order to encrypt a file you can run the following command:
ansible-vault encrypt {filename}

# e.g.
ansible-vault encrypt my-secrets.yml
Decrypt
Decryption works in a similar manner:
ansible-vault decrypt {filename}

# e.g.
ansible-vault decrypt my-secrets.yml
View and Edit
In order to view or edit the secret on the fly without changing the actual file you can use the following commands:
ansible-vault view {filename}

# e.g.
ansible-vault view my-secrets.yml
ansible-vault edit {filename}

# e.g.
ansible-vault edit my-secrets.yml
Change encryption password
The passphrase of an encrypted file can also be changed:
ansible-vault rekey {filename}

# e.g.
ansible-vault rekey my-secrets.yml
This will ask you for the current password and then you can enter a new one.
Vault password file
Since it is preferable to run Ansible in headless mode the need to enter a password is not helpful.
Therefore you can create a vault password file, which is supposed to be picked up by Ansible.
⚠️ Please make sure to not push this vault password file to version control!
So either put it outside the repository or add it to your .gitignore file.
echo "my_super_secret_password" >> .vault_password
To secure this even more we'd want to change the permissions of this file:
chmod 600 .vault_password
This ensures that only the root user can read and write to this file.
With the .vault_password in place it can be passed to the commands above like this.
ansible-vault encrypt --vault-password-file .vault_password {filename}

# e.g.
ansible-vault encrypt --vault-password-file .vault_password my-secrets.yml
Also this can be specified in the ansible.cfg file,
so that passing --vault-password-file is not mandatory.
[defaults]
inventory = inventory
private_key_file = ~/.ssh/ansible
remote_user=simon-ansible
vault_password_file=./.vault_password
# optional if not using default 22 port
remote_port = 22222
Ansible using encrypted files
Now that we know how to encrypt files, let us make use of these when running our playbook.
For this purpose we encrypt the ./vars/variables.yml file from the former chapter,
to not expose the user name.
ansible-vault encrypt ./vars/variables.yml
Running this command will turn the contents of ./vars/variables.yml into this:
$ANSIBLE_VAULT;1.1;AES256
32326530343030663238663666356335656330353430313333613130316631636466343339626361
6435383533386663613464613161303636343165303536330a656331323061643831366238316333
36613933373262303365353533616362353461626239323832396530663266373463633739386430
3234643164316639390a366338643130383331616632323264373466346137363165396236656134
33366632356232343963306562633864636434643237646363353431333566643936
Running ansible-playbook first_playbook.yml should just work as before, but the ./vars/variables.yml is now encrypted.
Using roles
Having all tasks inside one playbook will decrease the readability and harder to maintain. Roles can be used to organize certain tasks in a dedicated file structure, which make them reusable and fosters proper separation of concerns.
Basically our current playbook does 3 things right now:
- apt update
- copy a file
- creates and configures a dedicated ansible user
We now intend to move these tasks into respective roles and just let the playbook delegate to these roles:
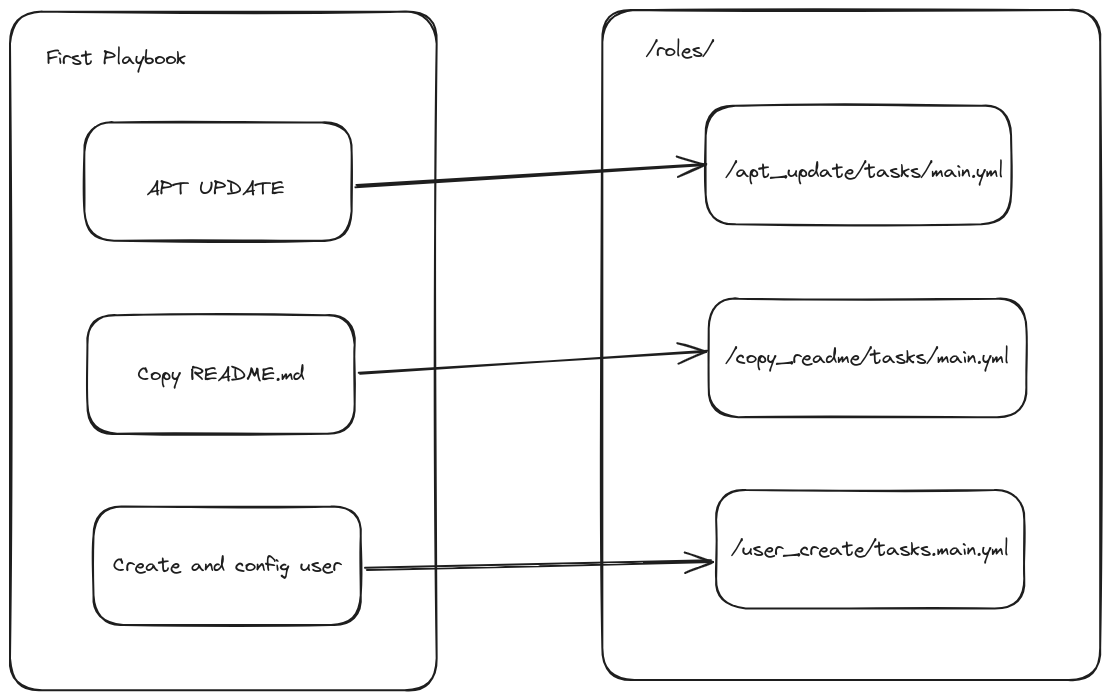
Therefore we create the following directories and files:
mkdir -p roles/apt_update/tasks/ \
         roles/copy_readme/tasks/ \
         roles/copy_readme/files/ \
         roles/user_create/tasks/ \
         roles/user_create/files/ \
&& touch roles/apt_update/tasks/main.yml \
         roles/copy_readme/tasks/main.yml \
         roles/user_create/tasks/main.yml \
&& mv files/README.md roles/copy_readme/files/README.md \
&& mv files/sudoer_simon_ansible roles/user_create/files/sudoer_simon_ansible \
&& rm -r files
After that the folder structure should look like this:
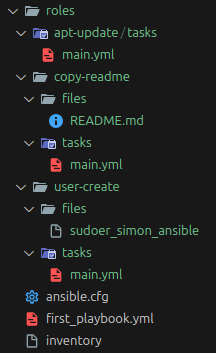
Now that the folder structure is in place we can copy the tasks from first_playbook.yml to the respective main.yml files.
/roles/apt_update/tasks/main.yml:
- name: Update repository index
  ansible.builtin.apt:
    update_cache: true
  changed_when: false
  when: ansible_distribution == "Ubuntu"
/roles/copy_readme/tasks/main.yml:
- name: Add README.md
  ansible.builtin.copy:
    src: README.md
    dest: /home/simon
    owner: root
    group: root
    mode: "0644"
/roles/user_create/tasks/main.yml:
- name: Add simon-ansible user
  ansible.builtin.user:
    name: simon-ansible
    groups:
      - root

- name: Add ssh key (user simon-ansible)
  authorized_key:
    user: simon-ansible
    key: "ssh-ed25519 AAAAC3NzaC1lZDI1NTE5AAAAIM0IWm4fVLFOYFydagOnkqaEvu9jnTUARRUYfQ0XnxFR ansible"

- name: Add sudoers file (user simon-ansible)
  ansible.builtin.copy:
    src: sudoer_simon_ansible
    dest: /etc/sudoers.d/simon-ansible
    owner: root
    group: root
    mode: "0644"
The first_playbook.yml file can now use the roles: property to delegate to the roles:
---
- name: My first playbook
  hosts: all
  become: true
  roles:
    - apt_update
    - copy_readme
    - user_create
When you now run the playbook...
ansible-playbook first_playbook.yml
... nothing should've changed and the outcome should still be the same. But we now have cleaned up a bit and have clear separation of concerns.
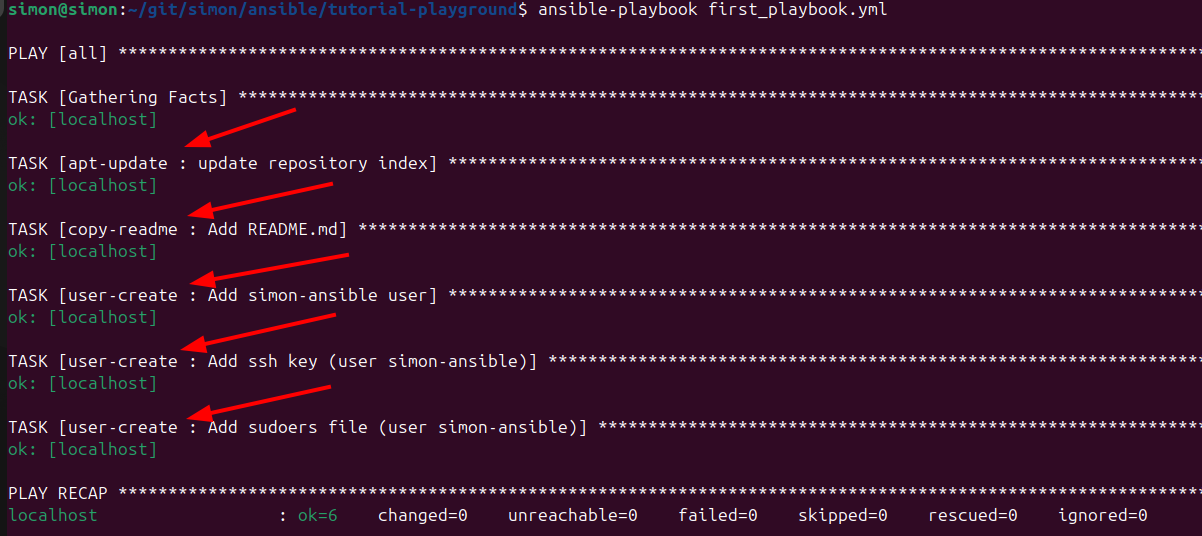
Note that the roles are also mentioned in the console output.
If you want to create a new role from scratch the ansible-galaxy cli can be used for this:
ansible-galaxy role init {role-name}

# e.g.
ansible-galaxy role init custom
Ansible Galaxy
On https://galaxy.ansible.com you can browse several collections and roles provided by the community.
So if you intend to do some basic operations using Ansible chances are that other's already did that before you. So instead of reinventing the wheel, you probably might want to search for a collection or role, which suits your needs. At least you can get inspirations from existing roles, that do archive a similar outcome you'd want to have.
You can even provide your own roles starting with the ansible-galaxy role init {role-name} mentioned earlier.
Install roles from Ansible Galaxy
You can install certain roles using the ansible-galaxy cli:
ansible-galaxy role install namespace.role_name

# e.g.
ansible-galaxy role install geerlingguy.security
Doing so will usually result in the role ending up in the ~/.ansible/roles directory.
By using the --roles-path param the path can be changed:
ansible-galaxy role install --roles-path . geerlingguy.security
Install roles from a requirements.yml
You can also create a requirements.yml file to specify, which roles should be installed.
Inside the requirements.yml file you have plenty of options:
- src - The source of the role. Use the format namespace.role_name, if downloading from Galaxy; otherwise, provide a URL pointing to a repository within a Git based SCM. See the examples below. This is a required attribute.
- scm - Specify the SCM. As of this writing only git or hg are allowed. See the examples below. Defaults to git.
- version - The version of the role to download. Provide a release tag value, commit hash, or branch name. Defaults to the branch set as a default in the repository, otherwise defaults to the master.
- name - Download the role to a specific name. Defaults to the Galaxy name when downloading from Galaxy, otherwise it defaults to the name of the repository.
An example could look like this:
- src: geerlingguy.security
  version: 2.4.0
- src: geerlingguy.docker
  version: 7.4.1
It is recommended to specify the version to avoid unexpected problems with newer versions of a role.
To install the roles from the requirements.yml file the following command can be run:
ansible-galaxy install -r requirements.yml
A word of caution
Blindly trusting third party dependencies is never a good idea and especially when it comes to ssh on your servers. So please be sure to review the roles or collections from the Ansible Galaxy or anywhere else before using them.
Also see Galaxy User Guide
